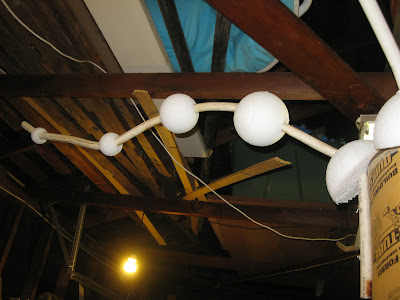
I wanted the five branches of the tree to be sturdy, but also as light as possible. I used 1" PVC pipes as a "bone" for each branch. They needed to be bent into the right shape.
First, I traced the previously made foam core branch pattern/mock up onto a wood board.
Starting at the thinnest part of the branch outline, I placed one end of PVC pipe between two large nails. I softened the PVC with a heat gun and began to bend it, conforming to the curve. I added nails where needed, cradling the pipe in place as I went along heating and bending. Once done, I had a completed jig to make the other four branch "bones" on.
I trimmed the tip of each pipe to size but left an extra 12" length at the base and bent it at a right angle. That portion was used to attach the branches on the trunk by screwing into the furring strip ribs.
Once all the bone pipes were on, I began to build them up. Since each branch had to match keeping to the measurements Vickie was knitting by, I used five Styrofoam balls per pipe as a "template of circumference" (for lack of better words to describe). Each ball was an increment of width in the design plan (5", 4", etc.). I skewered the largest first, ending with the smallest. Each were glued at the appropriate points. Now I had to fill in the gaps.
As I said, I wanted each branch to be a light as possible, so I bridged the spaces between the balls (and helped build up) with cut pieces of pipe insulating foam tubes.
Then I used expanding foam to fill gaps and rough in a more natural shape to the tree. It also created a light weight, but stronger support were the PVC pipe bones were just screwed in. At the base, the foam instantly hid the shelf brackets used to attach the trunk there. I was not concerned about how it looked right now. Building up the empty spaces and fusing parts together was the most important thing at this point. I let it expand away, drips and all.
Once dry, the foam was easily carved into truer branch shapes.
I left about a 1/2" of exposed PVC on the ends. There I added a 4-way pipe joint and curved pieces of pipe as extending branches. Next I started to base coat the tree in paper mache. I used sheets of heavy duty paper "shop" towels dipped in a thin mix of Fix-It-All.
I stopped at this point before I went any further and e-mailed pictures to Vickie so she could get a sense of what the finished tree will look like. It was a very good thing that I did. We discovered there was some miscommunication.
Next in Part Four... remember that Stonehenge scene from the movie Spinal Tap? Kind of like that in reverse.


Well Dave as they say... $%#^@!! the napkin!
ReplyDeleteHe he...
Its ok, we think you are brilliant!
Thanks In Irons!
ReplyDeleteI actually love this tree design and hope to make one of my own! Good for you!!!!
ReplyDelete