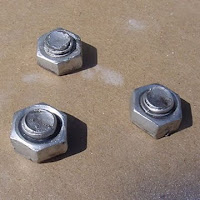
I've been working on a Halloween prop that will need many, many nuts & bolts as details, actually more than I want to count once finished. Because of that and my usual empty wallet, the bolts I'm using are fake. What you see above are just simple, homemade, lightweight, glued on applique copies of the real thing.
Here's a cheap, easy and I think, fun way to mold and cast small details with stuff you might already have around the house or find in any craft and hardware store. This method is not for those hoping to make perfect copies, but for those okay with slightly flawed details on a prop. For me it works, the aged and worn feel is perfect for Halloween. It's also a painless rookie introduction to molding and casting. Know that there will be trial and error doing this. It's just one of those things. You'll make a few screwed up ones. The good news is, it's so simple and easy that the results of your efforts are seen in minutes and just as quickly re-done if needed. For this "how to" I'm making the nuts & bolts I need but this trick can be used for creating many different details for other projects or props.
Materials:
-Fix-It-All patching compound or similar.
-Non air-hardening Polymer or Plasticine clay.
-Water.
-Disposable cup and spoon for mixing.
-Needle or pin.
-Fine grit sandpaper
-Paper towel
-Dust mask
-bolt or something to mold
Plaster or drywall mud can also used but I prefer Fix-It-All, it's a bit stronger than the other two once dry. The clay may stain certain objects so pick your molding subject carefully. The mold impression will usually be ruined after the casting is removed. So assume one copy per mold but you'll be able to re-use the clay after. If you need many casts, make a few molds while your at it. For outdoor props there is an exterior grade patching compound available or protect with a water sealing type clear coat (which you can do before or after painting). If you haven't noticed yet, I tend to over explain things sometimes.
Step 1:
Make a clay ball about 1" wider in diameter than the size of the nut & bolt. Next, firmly but slowly, push it into the clay straight down. Trying not to lean, turn or twist it. Then carefully pull it out the exact same way. There may be some slight distortion made to the impression while removing, try mushing the clay a bit until it looks right. Now you have your mold.

Step 2:
Use a dust mask here. In the cup, make a thin mix of Fix-All compound. Gravy thickness works for me, about a shot glass amount of water and one heaping spoonful of powder. This is more than enough for one bolt. It hardens very fast, so only mix what your going to use at a time. Pour slowly into the mold trying to avoid bubbles. Poke any with a pin or needle. Aesthetically, a few bubbles are not a problem as they usually rise to the top on the unseen back of your casting, but if too many they will create a honeycomb that can easily crumble and break away once dry.

Step 3:
Almost immediately you'll notice the mix will get heavier as it sets up and sink, forcing excess water it to the top. Dip a paper towel edge in to soak up the water, then add more mix. Repeat this as needed until you have a full level of solid mix. That's it, let it set up and harden at least 20 - 30 minutes. Larger or thicker molds will take longer.

Step 4:
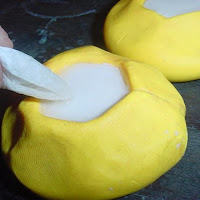
The fun part. Carefully pull the clay away and remove the casting. I recommend you set them aside for another hour to dry before sanding and painting. Just a side note, in the picture below you can see the yellow molds came out very clean with almost no residue on the clay, the red did not. This is due to my impatience popping out the casting when it had not fully set up. Not a problem though if it happens, the hardened residue can easily be scraped off to re-use the clay.

Step 5 :
Just some casting clean up tips. A fully cured one is best to work with and clean, it will turn a tea stained color especially darker at the edges when ready. Sand or trim edges with a fine grit sand paper but go slow, it's easy to remove too much working fast. Any unwanted gaps or holes can be filled by rubbing in some dry compound and dabbed with a wet finger or paintbrush.

Step 6:
Painting. Any paint or stain works great on Fix-All. It's very porous so a few coats or primer will be needed. For mine I used some brush-on chrome model paint and finished with a watered India ink wash, letting it get into all the recessed areas to create more depth. Depending what your attaching it too, Fix-It-All works well with almost any glue. As I mentioned earlier, if using for outdoor props, you should protect with a varnish or use exterior grade compound.

Here are some quick castings I made of random things around my studio.


Wow! Never even thought of clay! I'll try that...
ReplyDeleteThanks for the info!
You are truly amazing. You need your own show / people need to take notice of you and hire you for some huge projects for which you make gobs of money. and you're just giving this all away which is very altruistic and to be applauded but jeez you're too damn talented to do it this way. What's the matter with folks out there??????????????makes me crazy!!!!
ReplyDeleteReally cool!
ReplyDeleteI've been using that method for my other hobby- miniture wargaming. Welcome to casting Dave, you'll be addicted in no time!
ReplyDeleteNice! I just recently suggested to a friend that she cast screw- and bolt-heads as light decorations for a steampunk costume, so seeing your main picture intrigued me a lot, and the post gave me lots to think about.
ReplyDeleteThanks!
Wow, that's fantastic! I'll be linking to this post on Friday if you don't mind. I'm so excited about Halloween! Your to-do list really got me pumped.
ReplyDeleteExcellent! Can't wait to try this.
ReplyDeleteThanks for the info!
Awesome. Another thing to get distracted by for the next 29 days...
ReplyDeleteBTW - are you in Burbank?
Hot glue works well for casting small details too, as long as the item won't be subjected to extremely hot temeperatures (like a hot warehouse or attic)
ReplyDeleteI use plasticine clay as a quick disposable mold for resin casting too. However, when I pull my parts, they are always caked with clay that is hard to clean off. I have found that giving the clay mold a light coat of spray paint before casting helps tremendously with that problem. The paint bonds to the resin and lifts off the clay nice and clean. The clay is still re-usable and the little bit of over-spray doesn't seem to hurt it any.
ReplyDeleteHitting the stores day after Halloween is a gold mine of cheap cool stuff, got a silicon ice cube tray that was skulls for cubes, just add plaster and skulls to decorate! marshals is a good place to look and Michael's crafts.
ReplyDeleteLast year I made bolts that looked just like that. I used sand and did the same as your step 1. Wet sand is best. Then I filled with hot glue. Let cool. Then if there is too much I sliced it off with a razor blade. I think your method may save some money though. I painted with the metalic paints in tiny tubes from the craft store that you buff on. The clay I think makes a more precise copy.
ReplyDeleteTeri S.
Have you thought to try Sculpey clay? After you make the mold, you bake it. It stays slightly flexible to be able to pop out the cast. Then you would not have to keep making new molds. Cindy T.
ReplyDelete