I love the creepy statues that watch you walk by in Disney's Haunted Mansion. I've always wanted to make my own when I discovered how it was done. The secret? They're translucent, back lit and most important...concave. This creates the optical illusion of being 3-d and turning with you. Being the "zero spending" on decor year and with limited resources, I made a giant monster eye in one of our front windows that uses the same principle. It was just an experiment that worked. It's also really painless and simple to do.
Here's a quick video of it in action...
Before I get into how I made mine, seek out any alternate better materials that can be used here. I'm just using what I already have.
Materials: thin clear plastic bowl (mine was a large "pet" bowl from Petco), medium grit sandpaper, electric tape, x-acto knife or scissors, white printer paper or card stock, black sharpie, scotch tape, computer/printer or colored tissue paper (eye color of choice), window sized yardage of craft fur or black board/paper, thumb tacks, quick bond craft glue suitable for plastic and fabric.

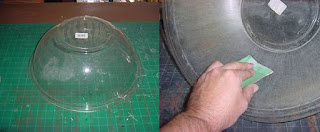
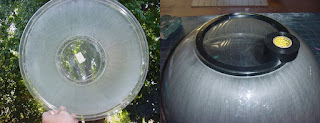
The bowl I used had a indented flat circular base. This was perfect as it gave me a centered instant template for an iris and pupil. I made the outer area frosted by gently scuffing the inside with sandpaper. I sanded in straight lines from the edge to center. The lines will help sell the 3-d illusion later. It's good to wipe away the dust as you go as it will give you a false sense of opacity. You could also use frosted glass craft paint instead.

Once happy with the translucence, I made the outside black line of the iris. I taped the raised edge of the base. I wanted this to be completely light proof and silhouetted. The electric tape is great being flexible and molds easily to the tight curves. Do the inside edge first in shorter strips. The tape tends to pull against itself here. The overlap of the outer edge tape will keep it from peeling.

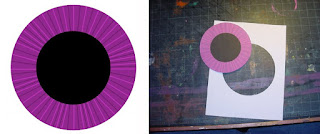
For the inner portion, I measured the diameter needed and created the color and pupil in Photoshop. I wanted it to be translucent and glow so printing on plain white paper works great. This also makes cutting out the perfect shape and size easy. Colored tissue paper or again, glass paint, would work well too.

I wanted the pupil to be as opaque as the taped ring. I colored in both sides with a black sharpie. The bleed through from coloring the front first gave me a template for the back.

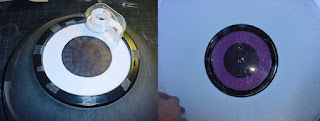
I decided to play it safe by not gluing the iris and pupil onto the bowl. I didn't want to risk messy residue or bubbling. I just scotch taped it, pulling it tight and flat. Remember, this needs to be concave so have the pretty side facing inside the bowl.

For the giant monster feel, I wanted to block out the whole window plus give the eye something to attach to. I happened to have 2 yards of craft fur left over from a past project which was perfect. The eye needed be flush. My bowl had a larger lip which created a "step" and gap. I cut that off. I test fitted the window and marked off where the eye would go, then traced the bowl's shape on the fabric.

I cut the circle out about a 1/4 inch smaller than my traced line. This insured a good fit and gave me the ability to wrap edges a little for a secure hold. I took my time gluing to avoid runs and drips. Remember, you want the bowl curving inwards away from the window.

Inside the room I just thumb tacked it to the top edge of the window frame. I used tape to pull it tighter where needed. You can also use poster board or black construction paper and tape it all in place.

I just pointed a swing arm desk lamp at it and waited for dark. I also pulled the bottom away from the wall and added a bit of under lighting so the fur would be hinted at. The photos I took are blown out. The sanded lines and a nice shadow really create a 3-d effect. I rushed to put it up today to see if it works, but tomorrow I'm making it a bit blood shot which should really make it pop. I'm thinking about adding a big toothy grin as well.

It's first and unexpected "soft opening" review came in tonight. My brother Ted was over and we were outside when a family walked by. One of the kid's pointed out the eye and yelled "It's following us! Look! Look! It's following us!"
Pistons, gears and gizmos...insignificant! But it would be really cool if I figured out how to use them one day.

You kind of might be my new Halloween hero.
ReplyDeleteI'm going to have to give this one a try :)
Your creativity blows me away! I'm so glad I discovered this blog! I'll be linking to this!
ReplyDeleteSome of the simplest things are the best! I've always loved the Haunted Mansion's staring busts, too.
ReplyDeleteI always like to leave a little wiggle room for the guests' imaginations. What they can't see or figure out is automatically filled in with whatever twisted ideas/images that their imaginations can come up with. More often than not, they end up scaring themselves!
You should be given a medal, a really spooky one, for providing us with this wealth of information in your blogs!
ReplyDeleteAbsolutely fantastic. The simplest props are so often the most enjoyable.
ReplyDeleteI love your blog!!! Heaps of thanks for the idea and the instructions. I'm always looking for ways to cut costs on Halloween deco, but you're idea is spooktacularly the best!!! Even though we couldn't find the same bowls you used, we were still able to make an eye, by using a large Tupperware bowl. It turned out way too cool, so we're going to add a second eye. Thanks, again!
ReplyDeleteIf I can find the time this year I'm going to try this myself.
ReplyDeleteThanks, Dave!
This is very nice job Keep it up.
ReplyDeleteI'd like to try this with two smaller bowls! then it would look like two eyes following you! add some red marker to the 'whites' for blood shot effect!
ReplyDeleteFound this tonight, there's so many things I want to do! My son's birthday falls just before halloween, for the past 3 years (this'd be year 4, extra creepy since he just hit the big 10!) we've done halloween costume parties. And of course, every year he wants it creepier than the year before, I think a couple of these would rock hard. Also, I'm all over some nasty specimin jars and scary books.
ReplyDeleteYou should be given a medal, a really spooky one, for providing us with this wealth of information in your blogs!Thank,s for so nice sharing.
ReplyDeletePlastic Card.
I just made 2 of these, so my house now looks like it has 2 eyes...it looks awesome.
ReplyDelete