Elves and the Shoemaker Part III: The Finished Poster Art

Here's the finished poster art for the Elves and the Shoemaker Itheatre production in Singapore (running from October 28th to November 13th).  I decided to give the main poster an actual storybook cover look with fancy scrolled edges made up of shoes and their laces.

This completes all the illustrations needed for this project. To see the other ones visit Part One and Part Two.

Some news. I was just asked to doodle up 360 views of the elves for their resident puppet maker and performer (and an old friend) Paul Pistore so he can actually create the ones I illustrated. Pretty cool.


New Job

Happy to say I just started a fairly long term job as art director for a new interstitial series on GSN. My main responsibilities are designing and making game set pieces and props. I think it's going to be a lot fun, especially when one of many projects this week was making silly sock puppets for a segment.

Eddie Izzard's Giant Squid


"Giant Squid Diary: Day One. Got to the boat, everything rather damp. Must inform Trip Advisor. Seem to be running out of ink. Met a number of animals. Interesting ones... cat, dog, squirrel, a mouse... I will eat them later."

Eddie Izzard's stand up inspired some sketching this weekend. I've been a fan of his for a long time and just saw his recent show here in Los Angeles at the Hollywood Bowl. It was very, very funny and actually a historical event. It was the first time a comedian ever headlined there. His absurd bit about giant squids being included in Noah's ark really cracked me up. You can see a portion of it via his Facebook page here.

Zombie a Month: Capt. Umpkin Bilgetober


 The Tale of Captain Bilgetober

At the peak of his pirate career, Capt. Umpkin Bilgetober looted the "Crone's Cauldron" a merchant ship out of Salem, Massachusetts. To his surprise, instead of riches, it was laden with pumpkins. In his frustration, he ordered them all smashed and the "Crone's Cauldron" sunk. Unfortunately, what Umpkin didn't know was that the ship and it's cargo belonged to the East Witch Trading Company.

A curse was put upon him. Every Oct 31st for all eternity he rises from his grave and must sail the "Crones' Cauldron" across the seven seas in one night collecting pumpkins to replace the ones he destroyed. Over the centuries Capt. Bilgetober has come to revel in his annual task and often emerges early in the month planning his voyage while enjoying casks and bottles of Candy Corn rum.

Some say, Umpkin's crew is made up of 31 shanghaied trick or treaters every year.

Captain Umpkin is going to be a Halloween prop makeover of Capt. Wigbeard who was created back in 2008.


He's always been one of my favorites and a character I've wanted to re-do closer to the look and back story I've had in my head for a while. My great grim garage is getting a good cleaning this week, so I think the nefarious Capt. will be my first Halloween prop to tackle as he's not too far from his new look. A good project to ease into ones that are starting from scratch.

Umpkin will be the old Wigbeard "blucky" skeleton reposed and repainted with all new costume elements added to the original, including a bigger hat. His head and hands will be all new. And I thought as long as he has a hook and patched eye, why not a new peg leg? He'll also now sit on a gravestone surrounded by some half buried plunder - including kegs and bottles of Candy Corn rum (since rum comes from fermented sugar cane or molasses, I figure not too far a stretch). My overall hope is to make him much more jovial and fun looking, inspired by classic Marc Davis Pirates of the Caribbean designs and sketches.

Change is Good: Part Three


Here's the new logo idea so far (click on image to enlarge). I did like the old cartoon and it seems others do to. So for now I'm going to consider keeping it but play around with some. Be fun to add a lot more small details not seen in the old one - like the pirate sword. Really pack it full of things so it represents more of what's in my imagination and workroom hoard.

Change is Good: Part Two

Some of the great comments from folk's sharing critique, thoughts and ideas about my planned logo change mentioned keeping the fun and personality of the one now. Thinking about it has lead me back to an old illustration and design I created as a business card and used 10 years ago. I just might revisit this idea and update. Maybe. We'll see. Gears in my head still spinning.

The card front was an homage to late 70's and early 80's Marvel Comics I grew up reading. The card back was my resume, but as if a Johnson Smith Company mail order ad from the era. Click on images to enlarge.


Halloween 2011: The Season is Upon Us.

I was doing some prop and supply shopping for a new job this weekend and ended up in Michael's and Party City. Both places already had their Halloween aisles sectioned off and selling some stuff. Michael's even had fall flower bouquets on display as you walk in the door. Excuse the poor quality camera phone pictures.


Pretty exciting, none too early for me. And speaking of, I'm starting to get serious about my prep for this October, so there will be a lot more about that posting here soon.

Change is Good


 It's time to get rid of my old logo/banner above. I'll miss it, but change is good.

Originally, it was never meant to last more than a month. A few years back I was counting down to Indiana Jones and the Kingdom of the Crystal Skull here and made the banner in theme just for fun. Before too long I became very attached to it and started using variations for my portfolio site and other self promo stuff. I decided to leave it be for the Raiders' 30th blog-a-thon as I doodled and thought about new ideas.

In the next few weeks the blog's look may change daily as I experiment with possible logos and layouts. I still want to have something that can be used for all my self promo stuff. At this point I'm leaning more towards a "steampunk" old world look, but hoping to explore many other themes before it's done.

Here are some really rough concepts so far...


The Final Raiders' 30th Post

Why did I spend time celebrating 30 years of Raiders of the Lost Ark with 30 posts?

I think a photo is worth a thousand words.

Me, age seven in 1972 on the balcony of our room in the Contemporary Hotel at Disneyworld imagining far off adventures wearing a cool hat years before Indiana Jones even existed.

Raiders' 30th: Indy-ing Up an Indy Fedora

My Disneyland fedora post makeover.

My niece Devin was only 3 or 4 when she made her first visit to Disneyland several years ago. Although she might of been a bit too young to fully appreciate and remember the experience, it was a big milestone and family event. I marked the occasion buying a souvenir Indiana Jones fedora for myself in Adventureland. It's been a decoration hanging in my workroom ever since.

It's an okay hat, somewhere between cheapo costume and one of real quality. What always gnawed at me though, outside of being brown and a fedora, was it never really looked like Indy's. I thought it time to change that. The goal was to reshape it into the distinct Jones' style and weather it so it looks like it has some mileage.

The Disneyland fedora before.

Now, I'm no hat maker. I'm not trying to make a perfect movie replica here or something to survive wear around town for years. I'm just making a prop for display. I do not recommend following what I did on any chapeau of value. Click on images to enlarge.

1) I removed the hat ribbon with an X-Acto cutting the small stitches holding it in place. I also removed the interior head band.


2) I wanted to make the crown a little bit higher like Indy's. This requires stretching it. Easy to do being ordinary wool felt. I placed the hat in a basin of warm water to soak for an hour or so. In the meantime I needed a hat block to reshape it on. It just so happened an ice bucket and glass bowl taped together was the perfect size as a makeshift one.
3) I took the soaking wet hat and pulled down over the block. I tugged and stretched all the way around gaining some extra height and warping the crown into a nice round shape above the brim.
 4) As the felt began to dry, I then worked on the brim. I made it flat to start and stretched it out as well, so as not to loose width making the crown higher. Don't want a pork pie hat.
 5) Next I started giving the brim some character, curling the edges.
 6) While still damp, but dry enough to hold it's shape, I pulled the hat off the block to give the crown it's distinctive Indy touches. I remade the top with a center indent like the movie version (as opposed to the original flat and wide tear drop shape it had). Then added a real tight pinch to the top front.
 7) Although the felt stiffens up pretty good just drying, I wanted the hat to be as solid as possible, so I soaked it with spray-on laundry starch and rubbed in.
 8) While still damp after starching, I added a bit more character to the overall shape by pulling the sides underneath into a tighter oval with tape while drying. This gives the crown the illusion of looking higher than it really is.

 9) Once completely dry, I aged it some. Nothing fancy here. First, a coat of spray glue.


10) Then using a small sifter I shook dirt all over it. Once the glue dried I knocked off the excess and any obviously larger dirt chunks.


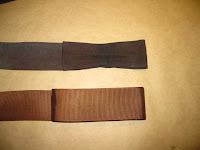
11) Time for fixing up the hat ribbon. I thought the original bow looked too flat. Plus the whole thing had a few scars from the stitching. I decided to make a new one using a ribbon similar in size and color from my stash. I think it came from some old gift box. Hoarding pays off again.


12) Using the original as a guide, I folded one end back over on itself.


13) Then it was folded over once more.
 14) To create the pinch, I folded it in half and simply stapled the edge on center.
 15) Now to cover the visible staple.
 16) I cut a piece off the other end (being sure I still had enough ribbon to go all the way around the crown).
 17) I folded over the edges and glued in place with Fabri-Tac (good stuff, I highly recommend to have in any prop maker's kit).
 18) Then wrapped and glued the piece around pinch and visible staple.
 19) In the movies, the ribbon often seems to look darker than the hat. I like that look, so while may not be film accurate, I gave the ribbon a wash of watered down black acrylic to increase it's contrast.
 20) The washy black ages it some, but I wanted sweat stains along it to look even more like the movies and feel well worn. Using ordinary table salt dissolved in hot water, I made a solution to brush on.
 21) I painted it along the edges of band and creases in the bow. Although not immediately visible, a little goes a long way here. Any undissolved salt bits discovered can be easily brushed off after drying.
 22) Once dry the salt stains appear. I added a bit more as needed here and there.
 23)  I carefully started wrapping the ribbon around the crown, spot gluing as I went and pinning to hold in place until the glue set up.
Finally, I went back and forth dusting on more dirt, scuffing up here and there with a wire brush and even adding on more salt solution around the brim and crown for extra character. In the end, no, not the perfect replica Indiana Jones fedora, but I think looks a bit better than it's original form and more believable as the one our adventurer archaeologist wore.

Raiders' 30th: Cargo Truck Hood Ornament Artifact


A new addition to my Cabinet of Curiosities. This odd artifact was said to be found in Egypt with other items salvaged after an international incident during the 1930s covered up by the US Government. I acquired it from someone who I can only say was one of few "top men" working in a secret warehouse somewhere. Even though it's just a rusty old Mercedes-Benz truck hood ornament, it seemed important enough to tag and save.


Creating an Indiana Jones relic is a tall order considering the subject manner and that some of the coolest props ever made came from those movies. Many of which are often recreated. I decided to keep this one simple, fun and in theme with the past "storytelling" artifacts I've made.

It's from one of the best moments, among many, in Raiders of the Lost Ark when our hero was tossed out of the cargo truck and grabbed the hood ornament in a desperate attempt to hang on. Then of course, in cliffhanger fashion, it breaks off! I've always wondered what happened to that emblem. In my imagination, at some point the US Government went in and cleaned up all the evidence of the Ark incidents, even the smallest details.


It was real easy to make. Using reference of a new one online, I cut out the shape from foamcore (about 3" in diameter). Knowing it was going to look beat up, rusty and 70 plus years old when finished I didn't stress on making my cuts, dimensions and angles exact or perfect. As seen in the movie, a small bottom edge of the ring seemed to have remained on the hood stand after it broke off. I also cut away more of it to add some weathered character as if been laying in the road for years.


I spray glued on a coat of dirt from the backyard for texture. Once dry I dusted off the excess and built up a few mottled coats of black, brown and orange craft acrylic for color. While wet I added another light dusting of dirt.

I made the label in Photoshop and printed onto card stock. I wanted to keep it unsophisticated, as if hastily scribbled in the field. After I trimmed it, I glued on construction paper made circles as old fashioned reinforcing rings and punched out a hole for the string. It's all aged with coffee.


 On a side note while on the subject of Indy artifact making, I posted earlier this month I was going to make Elsa's lighter from Last Crusade and share the "how-to". Believe it or not, it actually turned into a more involved project than I planned on. I've had to put on the back burner for now, but it will show up down the line here soon.