Halloween '09 - Stef's Giant Eyeball
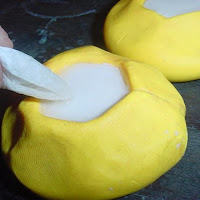
I really hate my friend and past co-worker Stefanie Girard...crafter, artist, author, blogger, decorator, TV producer and many other job titles too numerous to list. She's posted a clever and easy Halloween project "how to" on her site, Sweater Surgery.
I don't hate her because I didn't think of this first or some other jealous reason. I hate her because...well... it had to be a yoga ball? Come on, I'm the very last person on Earth who would have any exercise equipment to use. Thanks Stef, now I may have to go buy one from a healthy lifestyle store. Nothing on Halloween could ever scare me more than those places.
Click here to visit Stef's site.
Halloween '09 - Apothecary Jars on a Budget
Like many, I love creepy things in specimen jars. I prefer to create an eclectic display of containers every year. Different sized and shaped ones are more visually interesting to me and help tell a story that they've come from odd, mysterious, dark, distant places. Old world styled apothecary jars are great additions with their antique look and instant creepy feel.
They seem to be a popular Halloween item these days in many of the more "high end" decorating catalogues and stores. I want to add a few to my prop closet one day but will have to wait due to those "high end" prices. I know less expensive ones are out there to find but I'm also trying to keep it another "no budget" decorating year. So until I have the piles of cash to spend on every small detail I'd like for October, cheap or expensive, here's what I did to create some jars of my own. They'll make decent filler for my ever growing laboratory themed dining room.
What I used: old pickle and tomato sauce jars, disposable plastic champagne glasses (the kind with detachable bases), clear aquarium silicone, large craft jewels, rubber creatures and computer made labels. Not pictured: paint brush, super glue, glue stick, food coloring (yellow & green), water, Dremel tool and a strong cup of coffee (yes... coffee).
I created two style jars with what I had. For the spider jar's pedestal, I first assembled a champagne glass. Although the base and the stem fit tight, for security, I super glued them. Super glue vapors can fog up clear plastic, so I only used a small drop. Then I silicone glued it upside down to the bottom of the jar. Having the wider mouth of the champagne glass as a stand makes it stable.
The jar lid is also a flipped over glass but with an inch of the stem cut off using a Dremel tool. A craft jewel fit in the cut end neatly to complete the fancy top..
The worm jar was very simple. I liked it without a pedestal. For it's lid, because the open sauce jar top was smaller, just a detached champagne glass base worked with a glued on jewel.I made the labels on the computer, printed and cut out. I then dunked them in a strong cup of coffee for the aged look. Once dry and put on the jar with a glue stick, I brushed on more coffee while wrinkling and tearing the edges to really make them old.
Overall a quick prop making experiment that worked out okay. It should be fun making a few more playing around with different jars and combinations. I may take extra time on those...grinding the jewel points flat and cutting out the champagne glasses' base socket on lids like the worm jar's, so all appears more seamless.
They seem to be a popular Halloween item these days in many of the more "high end" decorating catalogues and stores. I want to add a few to my prop closet one day but will have to wait due to those "high end" prices. I know less expensive ones are out there to find but I'm also trying to keep it another "no budget" decorating year. So until I have the piles of cash to spend on every small detail I'd like for October, cheap or expensive, here's what I did to create some jars of my own. They'll make decent filler for my ever growing laboratory themed dining room.
What I used: old pickle and tomato sauce jars, disposable plastic champagne glasses (the kind with detachable bases), clear aquarium silicone, large craft jewels, rubber creatures and computer made labels. Not pictured: paint brush, super glue, glue stick, food coloring (yellow & green), water, Dremel tool and a strong cup of coffee (yes... coffee).
I created two style jars with what I had. For the spider jar's pedestal, I first assembled a champagne glass. Although the base and the stem fit tight, for security, I super glued them. Super glue vapors can fog up clear plastic, so I only used a small drop. Then I silicone glued it upside down to the bottom of the jar. Having the wider mouth of the champagne glass as a stand makes it stable.
The jar lid is also a flipped over glass but with an inch of the stem cut off using a Dremel tool. A craft jewel fit in the cut end neatly to complete the fancy top..
The worm jar was very simple. I liked it without a pedestal. For it's lid, because the open sauce jar top was smaller, just a detached champagne glass base worked with a glued on jewel.I made the labels on the computer, printed and cut out. I then dunked them in a strong cup of coffee for the aged look. Once dry and put on the jar with a glue stick, I brushed on more coffee while wrinkling and tearing the edges to really make them old.
Feel free to steal these labels. Let me know if you use them, be fun to see!
Creating the fluid was the hardest part...for a silly reason. I was momentarily obsessed with making the perfect hue using yellow & green food color. I spent more time doing that than it did to make the jars. I DO NOT recommend keeping water in the pedestal jar, I used just for the pictures. The base is stable but I don't trust it to be strong enough with the water weight for any extended or unsupervised time. I'm going to replace the water with colored film/gel or use stained glass paint.Overall a quick prop making experiment that worked out okay. It should be fun making a few more playing around with different jars and combinations. I may take extra time on those...grinding the jewel points flat and cutting out the champagne glasses' base socket on lids like the worm jar's, so all appears more seamless.
Cartooning Milestones
On Monday my web comic Para Abnormal welcomed it's 50,000th visitor and also on that day, I posted the 400th cartoon. It should be noted that 46,000 of those visitors are my Mom and only 27 of the 400 cartoons are actually good ones.
If you haven't stopped by yet, I hope you do and a big thank you to all who have been checking in regularly.
My Great Grim Ghastly Garage - Inspiration
I've been slacking on these updates. There's a current work stalemate in the garage between getting it in shape and becoming a mess again with Halloween making and other projects over the past few weeks. Neither can progress very well without one hampering the other at some point.
This has been bothering me until I watched a new show on A&E tonight called Hoarders.
Guess what? Organizing and de-cluttering wins. A premonition of myself becoming a story on the show's next season haunts me. I'm going to finish what I began long ago. Better to put projects on hold and have a creative fresh start in a clean space.
May The Fridge Be With You
From my "making something real quick because you're curious while waiting for paint to dry on something else but ends up sucking you in and spending too much time on" file.
For fun, inspired by Vickie Howell's kid friendly photo magnet project on her blog, I made my own Star Wars action figure "knock off" fridge magnets with the clay ball mold making trick I posted about (scroll down or click here). Which is basically mushing a ball of polymer clay onto the toy and peeling away carefully to create a mold, then using Fix-it-All to make to cast a copy. Not only did this give me reason to finally use some craft store magnets that have been in the stash for awhile, but more important...another example why collecting toys has purpose.
This started simply enough. I've always thought TIE fighter windows were an iconic design from the saga and decided one would make a cool fridge magnet. After that, love 'em or hate 'em, a cute Ewok was a must and so on. I realized this could get out of control quickly and stopped at just the four. I think Jabba turned out best but my favorite is the Wampa. He ended up more goofy looking than menacing, staring at me from the freezer door as if asking...
"Hey there buddy, getting some ice for that drink?"
Painting them was nostalgic. I used some old Tamiya Color acrylic I had. It took me back to when I got hooked on painting miniatures and building resin "garage" kits for awhile in the early '90s.
Halloween '09 - Molding and Casting, Cheap and Easy
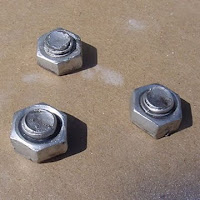
I've been working on a Halloween prop that will need many, many nuts & bolts as details, actually more than I want to count once finished. Because of that and my usual empty wallet, the bolts I'm using are fake. What you see above are just simple, homemade, lightweight, glued on applique copies of the real thing.
Here's a cheap, easy and I think, fun way to mold and cast small details with stuff you might already have around the house or find in any craft and hardware store. This method is not for those hoping to make perfect copies, but for those okay with slightly flawed details on a prop. For me it works, the aged and worn feel is perfect for Halloween. It's also a painless rookie introduction to molding and casting. Know that there will be trial and error doing this. It's just one of those things. You'll make a few screwed up ones. The good news is, it's so simple and easy that the results of your efforts are seen in minutes and just as quickly re-done if needed. For this "how to" I'm making the nuts & bolts I need but this trick can be used for creating many different details for other projects or props.
Materials:
-Fix-It-All patching compound or similar.
-Non air-hardening Polymer or Plasticine clay.
-Water.
-Disposable cup and spoon for mixing.
-Needle or pin.
-Fine grit sandpaper
-Paper towel
-Dust mask
-bolt or something to mold
Plaster or drywall mud can also used but I prefer Fix-It-All, it's a bit stronger than the other two once dry. The clay may stain certain objects so pick your molding subject carefully. The mold impression will usually be ruined after the casting is removed. So assume one copy per mold but you'll be able to re-use the clay after. If you need many casts, make a few molds while your at it. For outdoor props there is an exterior grade patching compound available or protect with a water sealing type clear coat (which you can do before or after painting). If you haven't noticed yet, I tend to over explain things sometimes.
Step 1:
Make a clay ball about 1" wider in diameter than the size of the nut & bolt. Next, firmly but slowly, push it into the clay straight down. Trying not to lean, turn or twist it. Then carefully pull it out the exact same way. There may be some slight distortion made to the impression while removing, try mushing the clay a bit until it looks right. Now you have your mold.
Step 2:
Use a dust mask here. In the cup, make a thin mix of Fix-All compound. Gravy thickness works for me, about a shot glass amount of water and one heaping spoonful of powder. This is more than enough for one bolt. It hardens very fast, so only mix what your going to use at a time. Pour slowly into the mold trying to avoid bubbles. Poke any with a pin or needle. Aesthetically, a few bubbles are not a problem as they usually rise to the top on the unseen back of your casting, but if too many they will create a honeycomb that can easily crumble and break away once dry.
Step 3:
Almost immediately you'll notice the mix will get heavier as it sets up and sink, forcing excess water it to the top. Dip a paper towel edge in to soak up the water, then add more mix. Repeat this as needed until you have a full level of solid mix. That's it, let it set up and harden at least 20 - 30 minutes. Larger or thicker molds will take longer.
Step 4:
The fun part. Carefully pull the clay away and remove the casting. I recommend you set them aside for another hour to dry before sanding and painting. Just a side note, in the picture below you can see the yellow molds came out very clean with almost no residue on the clay, the red did not. This is due to my impatience popping out the casting when it had not fully set up. Not a problem though if it happens, the hardened residue can easily be scraped off to re-use the clay.
Step 5 :
Just some casting clean up tips. A fully cured one is best to work with and clean, it will turn a tea stained color especially darker at the edges when ready. Sand or trim edges with a fine grit sand paper but go slow, it's easy to remove too much working fast. Any unwanted gaps or holes can be filled by rubbing in some dry compound and dabbed with a wet finger or paintbrush.
Step 6:
Painting. Any paint or stain works great on Fix-All. It's very porous so a few coats or primer will be needed. For mine I used some brush-on chrome model paint and finished with a watered India ink wash, letting it get into all the recessed areas to create more depth. Depending what your attaching it too, Fix-It-All works well with almost any glue. As I mentioned earlier, if using for outdoor props, you should protect with a varnish or use exterior grade compound.
Here are some quick castings I made of random things around my studio.
Friday Inspiration
"Life moves pretty fast. You don't stop and look around once in awhile, you could miss it."
October Growth All Over Town
A Bumble Relic
A new addition to my "cabinet of curiosities". It continues the childhood story relic theme I started with Hook's hand from last year. The tooth is carved craft foam, coated in a thin mix of Fix-All. Finished with acrylic washes. I kept the design similar to the teeth Hermey the Elf pulled from the Bumble in the Rankin Bass holiday special but tried to give it a somewhat realistic feel with yellowish plaque and rough surface decay. I estimated what the bicuspid size would be, it's a little over 18" long, felt about right if the Bumble were real. The base is 10" in diameter.
I'm going to re-make the display base at some point when I have the materials I want. This one is just an overturned wood plate with a dowel attached. It works but what I really want to do is place it on a bed of packing straw inside an open old crate with North Pole shipping labels or expedition info stenciled on the side, etc. You know, as if just arrived at the museum or...to be hidden away along side a certain ark in a warehouse somewhere.
Now, for anyone who has no idea what this prop refers to....watch this and step back in time.
Halloween How To's
With only two months until October, coal is now being thrown in my Halloween creative engine and things are about to get going full steam. I'm going to pick up where I left off on a few unfinished projects, expand on themes and improve old props. To help get my ideas and plans organized, I've gone back and been reviewing my past holiday work. My harsh self critique on it all could become a whole separate blog.
For those who might be interested, I made a link list to some of my Halloween "how to" projects below. It will also find a place in the sidebar as well at some point. I hope to add many new projects over the next couple of months.
Beware or be happy, most of these also fall into an ultra low budget category and adhere to my "instant creative gratification" code of prop making. Click on the name to view that project.
Dungeon Shackles
Following Eye Portrait
Giant Moving Monster Eye
Flameless Candle
Morphing Ghost Photo
Spider Cage
Witch Crash
Jason Dummy (in under an hour)
Polymer Clay Bottle Label
Captain Hook's Hand
Creepy Old Book Making
Invisible Man Specimen Jar